Low light photography can be a daunting challenge for many photographers. However, with the right techniques, you can unlock the brilliance hidden in dimly lit scenes. Whether you’re capturing the enchanting glow of city lights at night or the subtle ambiance of an indoor setting, understanding how to manipulate light can transform your images. This guide will explore essential low light photography techniques, covering everything from camera settings to composition tips.
You’ll learn how to adjust your camera settings effectively, use a tripod to stabilize your shots, and experiment with various light sources to enhance your compositions. Each section will provide practical tips and insights to help you capture stunning images in challenging lighting conditions. By the end of this guide, you will feel more confident and creative in your low light photography endeavors, enabling you to produce images that are not only technically proficient but also visually captivating. Let’s dive in and discover the art of mastering low light photography techniques.
Understanding Low Light Photography
What is Low Light Photography?
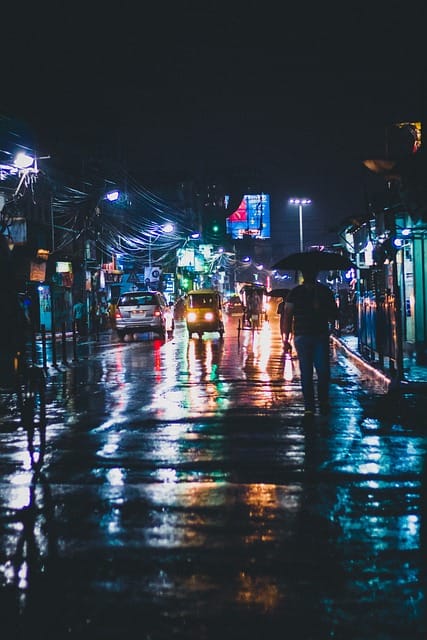
Low light photography refers to capturing images in environments with limited light. These situations can include dusk, nighttime, or poorly lit interiors. Photographers often face challenges such as noise, motion blur, and lack of detail in shadows. However, by mastering low light techniques, you can create visually striking images that convey mood and emotion.
The Importance of Light in Photography
Light is the fundamental element of photography. It affects exposure, color, and mood. In low light situations, understanding how to manipulate light can make a significant difference in your results. Utilizing natural light, artificial sources, or long exposures can enhance your images and create unique effects.
Essential Techniques for Low Light Photography
1. Adjusting Camera Settings
To succeed in low light photography, it’s crucial to adjust your camera settings accordingly.
a. Use a Wide Aperture
A wider aperture (lower f-stop number) allows more light to enter the camera. This is particularly beneficial in low light situations. Aim for an aperture of f/2.8 or wider when possible. It not only lets in more light but also creates a shallow depth of field, adding artistic blur to your background.
b. Increase ISO Sensitivity
Increasing the ISO setting boosts your camera’s sensitivity to light. However, higher ISO settings can introduce noise into your images. Experiment with ISO settings, but aim for the lowest ISO that still allows for a properly exposed image. Most modern cameras can handle ISO settings of 1600 or higher without significant noise.
c. Slow Down the Shutter Speed
In low light situations, you might need to use slower shutter speeds to allow more light to reach the sensor. However, be cautious, as slower shutter speeds can result in motion blur if you’re hand-holding the camera. Use a tripod whenever possible to maintain stability and reduce blur.
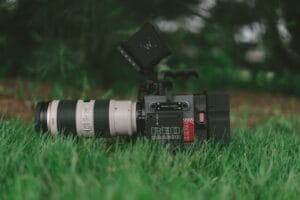
2. Using a Tripod
A tripod is an invaluable tool for low light photography. It allows you to stabilize your camera for longer exposures without introducing motion blur. When shooting at slow shutter speeds, using a tripod can help you achieve sharp, clear images. If you don’t have a tripod, consider using a stable surface to rest your camera.
3. Utilizing Image Stabilization
Many modern lenses and cameras come with image stabilization features that can help reduce blur in low light situations. This technology compensates for small camera movements, allowing for sharper images at slower shutter speeds. Ensure this feature is activated when shooting in low light.
4. Mastering Manual Focus
In low light, autofocus systems may struggle to find a subject, leading to missed shots. Switching to manual focus allows you to have full control over the focus point. Take your time to ensure that your subject is sharp and clear, especially when working with low light.
5. Embracing Long Exposures
Long exposure photography is a popular technique in low light settings. By using a slow shutter speed, you can capture motion blur or create light trails from moving objects. This technique requires a tripod and can produce captivating results, such as soft, flowing water or streaks of light from vehicles.
Creative Composition Techniques
1. Framing Your Shot
Composition plays a vital role in low light photography. Look for interesting frames within your environment, such as doorways, windows, or branches. Framing your subject can create depth and draw the viewer’s eye to the focal point of your image.
2. Leading Lines
Incorporating leading lines can guide the viewer’s gaze through the photograph. These lines can be roads, fences, or natural elements that lead to your subject. In low light, leading lines can help create a sense of movement and direction.
3. Playing with Shadows
Shadows can add intrigue and drama to your low light photographs. Experiment with how shadows fall in your scene and use them to create contrast. Shadows can enhance the mood of your image and add depth to your composition.
4. Capturing Reflections
Look for opportunities to capture reflections in water, glass, or other surfaces. Reflections can create stunning visual effects in low light and add a unique layer to your composition. Position yourself strategically to capture interesting reflections that complement your subject.
5. Experimenting with Light Sources
Low light photography often involves creative use of light sources. Incorporate streetlights, candles, or other artificial lights to add interest to your images. Positioning your subject near a light source can create dramatic effects and highlight important elements.
Additional Techniques for Low Light Photography
1. Using ND Filters
Neutral Density (ND) filters reduce the amount of light entering your camera without affecting color. This can be particularly useful for long exposures in bright conditions. For low light photography, ND filters can help create ethereal effects, such as soft motion blur in moving water or clouds.
2. Exploring HDR Photography
High Dynamic Range (HDR) photography involves capturing multiple exposures of the same scene and combining them to create a single image with greater detail in both highlights and shadows. This technique can be especially beneficial in low light situations, where the dynamic range of light may exceed the camera’s capability.
3. Utilizing a Remote Shutter Release
A remote shutter release allows you to take photos without physically touching the camera, reducing the chance of camera shake. This is particularly useful for long exposures in low light. Many cameras have wireless remote options, or you can use a wired remote for added stability.
4. Understanding the Histogram
Learning to read your camera’s histogram can help you understand exposure levels in your images. In low light photography, it’s essential to ensure that your histogram doesn’t clip at either end, which would indicate loss of detail in shadows or highlights. Use the histogram to make real-time adjustments to your settings.
5. Practicing Patience
Low light photography often requires patience and practice. Take the time to experiment with different settings, compositions, and light sources. The more you practice, the better you will understand how to achieve your desired results.
Post-Processing Tips for Low Light Photos
1. Reducing Noise
Noise is a common issue in low light photography. Use photo editing software to reduce noise in your images. Most programs offer noise reduction tools that can help smooth out grainy areas without sacrificing detail. Programs like Adobe Lightroom and Capture One have robust noise reduction capabilities.
2. Enhancing Contrast
Adjusting contrast can add depth and dimension to your low light photographs. Increase contrast in your images to bring out details in shadows and highlights. This technique can make your photos more visually appealing and striking. Utilize the tone curve in your editing software to refine the contrast to your liking.
3. Adjusting Exposure
If your images are underexposed or overexposed, use post-processing tools to adjust the exposure levels. Be cautious not to overdo it, as this can lead to loss of detail. Aim for a balanced exposure that enhances the overall quality of your image. Use exposure sliders judiciously for optimal results.
4. Using Color Grading
Color grading can elevate the mood of your low light photography. Experiment with different color tones to achieve the desired atmosphere. Warmer tones can evoke a cozy feel, while cooler tones can create a more dramatic ambiance. Tools like Luminar AI offer excellent options for color grading.
5. Cropping for Composition
Sometimes, cropping can enhance the composition of your image. Use cropping tools to remove distractions or reposition your subject for a more balanced shot. Ensure that the main focus remains clear and prominent after cropping. When cropping, maintain the aspect ratio to keep the intended composition.
Advanced Techniques for Low Light Photography
1. Utilizing Light Painting
Light painting is an artistic technique where you use a light source to “paint” the scene while taking a long exposure photograph. This can create mesmerizing effects and unique compositions. Experiment with different light sources, such as flashlights or sparklers, to achieve various results.
2. Exploring Time-Lapse Photography
Time-lapse photography involves capturing a series of images at set intervals to create a video that shows the passage of time. In low light conditions, time-lapse can be particularly captivating, as it allows you to capture changes in lighting and movement. Use a sturdy tripod and intervalometer to automate the process.
3. Using Creative Bokeh
Bokeh refers to the aesthetic quality of the out-of-focus areas in a photograph. In low light, achieving beautiful bokeh can enhance your images. Use a wide aperture to create a shallow depth of field and isolate your subject against a softly blurred background.
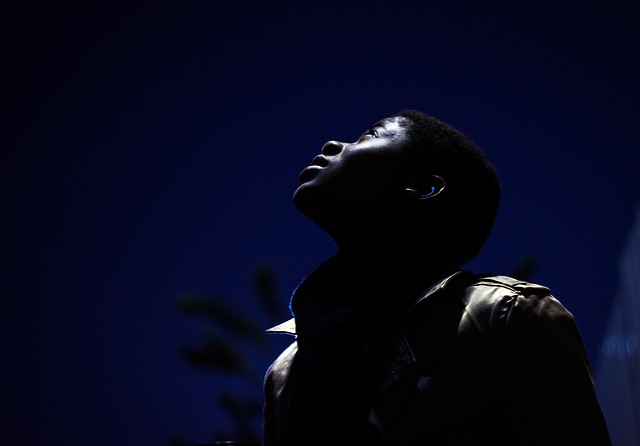
4. Experimenting with Silhouettes
Silhouettes can be a powerful way to convey emotion in low light photography. Position your subject in front of a light source, allowing the light to create a dark outline. This technique adds a dramatic and artistic flair to your images. Pay attention to the background to ensure it complements the silhouette.
5. Capturing the Night Sky
Low light photography offers the chance to explore astrophotography and capture the beauty of the night sky. Use long exposure techniques to photograph stars, planets, and celestial events. Ensure that you have a sturdy tripod and use a wide-angle lens to capture expansive views of the night sky.
Conclusion
Mastering low light photography techniques can open a world of creative possibilities. With a solid understanding of camera settings, composition, and creative techniques, you can capture stunning images in challenging lighting conditions. Remember to be patient and experiment with various approaches. Each time you venture into low light situations, take the opportunity to practice and develop your skills further.
By embracing the beauty of low light, you can create photographs that tell powerful stories and convey deep emotions. Whether you’re photographing a bustling cityscape at night or a quiet moment in a dimly lit room, the right techniques will help you unlock the brilliance hidden within these scenes. So grab your camera, head into the dark, and start exploring the art of mastering low light photography techniques.